Prompt Baseで販売されている画像を真似してプロンプトを作ってみた! 簡単なタトゥーアート編
wasawo_chat_fun
こんにちは、Wasawoです。
このTipsではプロンプトベースの画像を真似たプロンプトを作成して実際に画像生成してみる事をやっていきます。基本的な流れは③の基本事項まとめのページにて公開していますので、初めての方はまず基本事項まとめページを見てくださいね。
- 参考文献
- 実際のプロンプト(Copilot(DALL·E 3))
- 基本事項まとめ
参考文献
実際のプロンプト
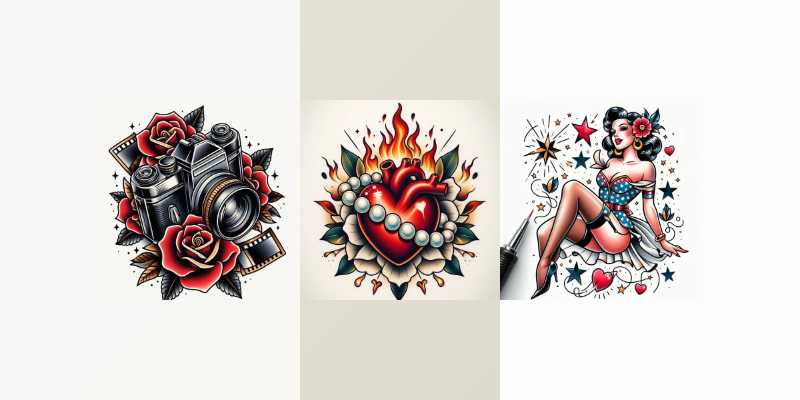
早速、今回真似た参考元。

そして私が参考にして生成した画像がこちら


今回は簡単なタトゥーアートができたかと思います。
そして今回、要素を抽出したプロンプトです。
1,マスコットキャラクター
Generate illustration, stylised illustration of Argument 2 surrounded by Argument 1, similar to a tattoo design, colourful and stylish. In the centre, Argument 2 is drawn and finely shaded to create a three-dimensional effect. Around argument 2, argument 1 is intricately designed. Surrounding Argument 2 is Argument 3, which adds contrast to the intense colours of Argument 2. Overlying argument 2 is argument 4, which adds an element of elegance to the intense image. The background is completely white, visually highlighting all the elements. This image resembles a tattoo design.

Argument 1 = "[Hibiscus and leisure facilities.]"
Argument 2 = "[Very popular mascot character.]"
Argument 3 = "[amusement park.]"
Argument 4 = "[overhanging roller coaster.]"

2,バニーガールのお姉さん
Generate illustration, stylised illustration of Argument 2 surrounded by Argument 1, similar to a tattoo design, colourful and stylish. In the centre, Argument 2 is drawn and finely shaded to create a three-dimensional effect. Around argument 2, argument 1 is intricately designed. Surrounding Argument 2 is Argument 3, which adds contrast to the intense colours of Argument 2. Overlying argument 2 is argument 4, which adds an element of elegance to the intense image. The background is completely white, visually highlighting all the elements. This image resembles a tattoo design.

Argument 1 = "[A colourful pattern, such as a parade.]"
Argument 2 = "[beautiful bunny girl lady.]"
Argument 3 = "[hand-drawn symbols of stars and hearts]"
Argument 4 = "[Silk cloth.]"

3,一眼レフカメラ
Generate illustration, stylised illustration of Argument 2 surrounded by Argument 1, similar to a tattoo design, colourful and stylish. In the centre, Argument 2 is drawn and finely shaded to create a three-dimensional effect. Around argument 2, argument 1 is intricately designed. Surrounding Argument 2 is Argument 3, which adds contrast to the intense colours of Argument 2. Overlying argument 2 is argument 4, which adds an element of elegance to the intense image. The background is completely white, visually highlighting all the elements. This image resembles a tattoo design.

Argument 1 = "[negative film and roses.]"
Argument 2 = "[2SLR camera.]"
Argument 3 = "[negative film and roses.]"
Argument 4 = "[roses.]"
今回の変更を加える部分は4箇所です。
今回はどこが引数なのかをわかりやすくするために引数のコードに「[]」を付けました。
「[]」は引数としてわかりやすくしているので、実際にコードを入力するときは「[]」を外して下さい。
男女の逢瀬を参考例に紐解いていきましょう。
- Generate illustration, stylised illustration of Argument 2 surrounded by Argument 1, similar to a tattoo design, colourful and stylish. In the centre, Argument 2 is drawn and finely shaded to create a three-dimensional effect. Around argument 2, argument 1 is intricately designed. Surrounding Argument 2 is Argument 3, which adds contrast to the intense colours of Argument 2. Overlying argument 2 is argument 4, which adds an element of elegance to the intense image. The background is completely white, visually highlighting all the elements. This image resembles a tattoo design. ←固定要素「タトゥーのようなカラフルでスタイリッシュなデザイン。中央には論証2が描かれ、立体感を出すために細かく陰影がつけられている。論証2の周りには、論証1が複雑にデザインされている。論証2を囲むのは論証3で、論証2の強烈な色彩にコントラストを加えている。論題2の上には論題4があり、強烈なイメージにエレガンスの要素を加えている。背景は真っ白で、すべての要素を視覚的に際立たせている。このイメージはタトゥーのデザインに似ている。」
- ★Argument 1 = "[Hibiscus and leisure facilities.]" ←固定要素「論拠1="【ハイビスカスとレジャー施設】"」
- ★Argument 2 = "[Very popular mascot character.]" ←固定要素「論点2=「【大人気のマスコットキャラクター】」」
- ★Argument 3 = "[amusement park.]" ←固定要素「論点3=「【遊園地】」」
- ★Argument 4 = "[overhanging roller coaster.]" ←固定要素「論点4="【張り出しジェットコースター】」
今回の要素は4箇所。論拠=引数と捉えて問題ないです。
1つ目の引数はメインの周りの装飾
2つ目の引数はメインとなるもの
3つ目の引数は周りの装飾のサブ(引数1の補足的な感じですね)
4つ目の引数はメインの上に乗せても良いと思えるオブジェクト
引数(対象物)を別の引数に差し替えると簡単に画像が生成されます。この引数部分に詳細を書くと思い描く画像が生成できると思います。
対象の動物やカラーが思いつかない時はをOpenAIを利用すれば候補をいくつか用意してもらう事が可能です。自分で考える事なく、30案など、一瞬で候補を出してくれます。
今回のキーワードはボリューム的には結構多めだったかなと思います。
書かれている事は殆ど固定要素なので、変えるべき箇所はたった4つ。何も難しい事はありません。
重要なのは必要な要素が何なのか、見たものをそのまま画像生成AIに伝える力が重要であると言えます。
ポイントは対象物がなんなのか、どんな外見をしているのかをプロンプトで詳細に伝える事だと思います。
見たものをそのまま真似るを基礎ベースとして、生成していく内に真似るよりも良いものが偶然出来上がったりするのも楽しみの一つですね。
今後も真似っこシリーズを進めていきますので、気になる方はどうぞ他の記事も是非ご覧下さいませ!
今回は参考元に似たデザインが生成できたかと思います。
Wasaoでした。
基本事項の流れのまとめは下記より確認できます。